Preparation Development VMInfoFace Programming |
Preparation and requirement of Development Environment to VMInfoFace programming
This topic contains the following sections:
Components and helpers about programming
This section contains the following subsections:
Prepare Development Environment
Install SOWI Framework
Install SOWI Framework library (folder lib) and tools (folder tools) in folder
..\VMInfoFace\Source\packages\SOWI.Components.17.0.0
Example for batch file (_SOWIComponentsCopyToPackage.bat)
@Echo off
cls

echo ----------------------------------------------------------------------
echo SOWI Framework DLLs copy to SOWI Components Package directory
echo ----------------------------------------------------------------------
:start
choice /c jn /m "to run press j"
if "%errorlevel%"=="1" goto runto
if "%errorlevel%"=="2" goto end

:runto
echo declaration paths...
set packagesourcepath=C:\Daten\Projekte\SOWIApp\Source\packages\SOWI.Components.17.0.0\
set packagetargetpath=C:\Daten\Projekte\SOWIApp\Project\VMInfoFace\Source\packages\SOWI.Components.17.0.0\

echo clear package directory...
del %packagetargetpath%*.* /s /q

echo copy SOWI components ...
xcopy %packagesourcepath%*.* %packagetargetpath% /s

pause

:end
Usage of SOWI Framework
Reference to library
Go to Solution Explorer and select project to usage SOWI Framework components
Select item References in project
Open context menu over References item and click Add Reference...
Dialog Reference Manager ..
Push button Browse...
Dialog Select the files to reference...
Navigation folder to SOWI Framework DLL files
Select to uses DLL files
Push button Add
Close dialogue Reference Manager .. by button OK
Interface to vSphere Web Services SDK implement in project VMInfoFace.Interface
This section contains the following subsections:
- Prepare Development Environment
- Build the SSO DLL with the Web Services SDK
- Prepares SSO DLL for GAC
- Build the C# vSphere DLLs for the Web Services SDK
- Prepares service DLL (Vim25Service.dll) for GAC
- Building the C# Sample Programs in the Web Services SDK
- Running the Microsoft .NET C# Version of SimpleClient in the Web Services SDK
- Usage of VMware vSphere API
Prepare Development Environment
Install Components
Install the Microsoft Visual Studio programming environment with Microsoft Visual C#.
Choose include the option Microsoft Foundation Classes for C++.
Obtain the Microsoft .NET Framework, if it is not included in the Microsoft Visual programming environment.
Use .NET version 4.5 or later, depending on your Visual Studio version.
Install Microsoft Windows Driver Kit (WDK).
Download and unzip the VMware vSphere Web Services SDK package from the VMware Web site at
Build the SSO DLL with the Web Services SDK
In the vSphere Web Services SDK, VMware supplies several sample Single Sign-On (SSO) clients for Visual Studio.
Before you run the SDK samples or a other program to vSphere handling, you must build the SSO DLL.
Create STSService.dll
Open a Visual Studio Native Tools command prompt.
Navigate to the .NET subdirectory for SSO client samples.
cd path_to_sdk\ssoclient\dotnet\cs\samples
Generate a test certificate and STSService stubs using the build.bat script.
build.bat
File STSService.dll copy to folder path_to_sdk\vsphere-ws\dotnet\cs\samples\lib\
Prepares SSO DLL for GAC
Assembly prepare for the GAC. Requirement assembly need a strong name.
Note: the STSService.dll from procedure "Create STSService.dll" is store in folder
path_to_skd\vsphere-ws\dotnet\cs\samples\lib
If the DLLs get strong names, STSService.dll must be signed first.
STSService.dll to strong name
Open a Visual Studio Native Tools command prompt.
Navigate to the .NET subdirectory for SSO client samples.
path_to_sdk\vsphere-ws\dotnet\cs\samples\lib\
Create a key pair using the Strong Name tool (sn.exe). Key pair files have an .snk extension.
sn -k VMwareSDK.snkNote: Strong Name tool (sn.exe) store in folder
C:\Program Files\Microsoft SDKs\Windows\v10.0A\bin\NETFX 4.6.1 Tools\Create a IL file from DLL ildasm /all STSService.dll /out:STSService.il
Note: IL Disassembler tool (ildasm.exe) store in folder
C:\Program Files\Microsoft SDKs\Windows\v10.0A\bin\NETFX 4.6.1 Tools\Sign DLL assembly from IL file and key file ilasm STSService.il /dll /key=VMwareSDK.snk
Note: IL Assembler tool (ilasm.exe) store in folder
C:\Windows\Microsoft.NET\Framework\v4.0.30319\
Batch example to singed STSService.dll
@Echo off
cls

echo ---------------------------------
echo Certification STSService.dll file
echo ---------------------------------

:start
choice /c jn /m "to run press j"
if "%errorlevel%"=="1" goto runto
if "%errorlevel%"=="2" goto end

:runto

echo set path.....
rem if command prompt run from "Administrator: Developer Command Prompt for VS2015" then not using next command Path
rem Path=C:\Program Files\Microsoft SDKs\Windows\v10.0A\bin\NETFX 4.6.1 Tools\;C:\Windows\Microsoft.NET\Framework\v4.0.30319;

echo set variable.....
set KeyFile=VMwareSDK.snk

echo generate certification key file for sign.....
sn -k %KeyFile%

echo create IL file from DLL.....
ildasm /all STSService.dll /out:STSService.il

echo sign DLL assembly from IL file and key file.....
ilasm STSService.il /dll /key=%KeyFile%

Pause

:end
Build the C# vSphere DLLs for the Web Services SDK
Create Vim25Service.dll
Open a Visual Studio Native Tools command shell as Administrator.
Note: Use Visual Studio 2012 or 2013. Visual Studio 2015 is not supported for this step.
Solution for Visual Studio 2015
copy %programfiles%\Microsoft Visual Studio 14.0\Common7\Tools\VsDevCmd.bat path_to_sdk\vsphere-ws\dotnet\bin
Run command shell as administrator
cd path_to_sdk\vsphere-ws\dotnet\bin
Run the batch for command settings
VsDevCmd.bat
Navigate to the .NET subdirectory for vSphere client samples.
cd path_to_sdk\vsphere-ws\dotnet\bin
Run the build script to generate the VimService*.dll files from the WSDL.
Note: command shell to call batch file must as an administrator and path access to windows system files
build.bat
The script builds the client-side API bindings and compiles them into the Vim25Service DLL.
File Vim25Service.dll copy to folders
path_to_sdk\vsphere-ws\dotnet\cs\samples\lib\
path_to_sdk\ssoclient\dotnet\cs\samples\lib\
Prepares service DLL (Vim25Service.dll) for GAC
Assembly prepare for the GAC. Requirement assembly need a strong name.
Note: the Vim25Service.dll from procedure "Build the C# vSphere DLLs for the Web Services SDK" is store in folder
path_to_sdk\vsphere-ws\dotnet\cs\samples\lib\
path_to_sdk\ssoclient\dotnet\cs\samples\lib\
If the DLLs get strong names, Vim25Service.dll must be signed first.
Vim25Service.dll to strong name
Open a Visual Studio Native Tools command prompt.
Navigate to folder
cd path_to_sdk\vsphere-ws\dotnet\binCreate a key pair using the Strong Name tool (sn.exe). Key pair files have an .snk extension.
sn -k VMwareSDK.snkNote: Strong Name tool (sn.exe) store in folder
C:\Program Files\Microsoft SDKs\Windows\v10.0A\bin\NETFX 4.6.1 Tools\Create a IL file from DLL
ildasm /all Vim25Service.dll /out:Vim25Service.ilNote: IL Disassembler tool (ildasm.exe) store in folder
C:\Program Files\Microsoft SDKs\Windows\v10.0A\bin\NETFX 4.6.1 Tools\Sign DLL assembly from IL file and key file
ilasm Vim25Service.il /dll /key=VMwareSDK.snkNote: IL Assembler tool (ilasm.exe) store in folder
C:\Windows\Microsoft.NET\Framework\v4.0.30319\Copying DLL to lib folders
copy Vim25Service.dll ..\cs\samples\lib\
copy Vim25Service.dll ..\..\..\ssoclient\dotnet\cs\samples\lib\
Batch example to singed Vim25Service.dll and coping to lib folders
@Echo off
cls

echo -----------------------------------
echo Certification Vim25Service.dll file
echo -----------------------------------

:start
choice /c jn /m "to run press j"
if "%errorlevel%"=="1" goto runto
if "%errorlevel%"=="2" goto end

:runto

echo set path.....
rem if command prompt run from "Administrator: Developer Command Prompt for VS2015" then not using next command Path
rem Path=C:\Program Files\Microsoft SDKs\Windows\v10.0A\bin\NETFX 4.6.1 Tools\;C:\Windows\Microsoft.NET\Framework\v4.0.30319;

rem folders to store Vim25Service.dll
set SDK_LIB="%~dp0..\cs\samples\lib\"
set STS_SDK_LIB="%~dp0..\..\..\ssoclient\dotnet\cs\samples\lib\"

echo set variable.....
set KeyFile=VMwareSDK.snk

echo generate certification key file for sign.....
sn -k %KeyFile%

echo create IL file from DLL.....
ildasm /all Vim25Service.dll /out:Vim25Service.il

echo sign DLL assembly from IL file and key file.....
ilasm Vim25Service.il /dll /key=%KeyFile%

echo copying DLL to lib folders.....
copy Vim25Service.dll %SDK_LIB%
copy Vim25Service.dll %STS_SDK_LIB%

Pause

:end
Building the C# Sample Programs in the Web Services SDK
If VMInfoFace assemblies to install Global Assembly Cache (GAC) then be must sets strong name.
Application VMInfoFace used project AppUtil is linking projects:
AcquireBearerTokenByUserCredentialSample,
VMware.Binding.WsTrust,
VMware.Security.CredentialStore
This projects have to be signed.
Project sign
In Solution Explorer, open the shortcut menu for the project, and then choose Properties.
Choose the Signing tab.
Select the Sign the assembly box.
In the Choose a strong name key file box, choose "Browse…", and then navigate to the key file. To create a new key file, choose "New…" and enter its name in the Create Strong Name Key dialog box.
Web Services SDK
Launch Visual Studio and load the solution file, Samples2012.sln.
The solution file is found in the path_to_sdk\vsphere-ws\dotnet\cs\samples directory.
From the Visual Studio menu, select Build > Build Solution. All the sample programs build. The Output pane at the bottom of the Visual Studio window shows build errors, if any.
Correct any errors in the build, and repeat the build.
Running the Microsoft .NET C# Version of SimpleClient in the Web Services SDK
Simple Client Application
Open a Visual Studio Tools command shell.
Navigate to the subdirectory where the compiled object code is located. From the top-level directory of the SDK download, the directory is as follows:
path_to_sdk\dotnet\cs\samples\SimpleClient\bin\Debug
Run the application, passing at least the service URL, an authenticating user name, and a password on the command line. For a development environment, you do not need to use SSO or certificate authentication. You can authenticate directly with the server by specifying --disablesso and --ignorecert on the command line. For example:
simpleclient --url https://esx.exampledomain.com/sdk --username root --password secret --disablesso --ignorecert
The application connects to the server and displays a list of inventory objects managed by the server.
Sample Output of a Successful Run of SimpleClient
Object Type : Datacenter
Reference Value : ha-datacenter
Property Name : name
Property Value : ha-datacenter
Reference Value : ha-folder-root
Object Type : Folder
Reference Value : ha-folder-root
Property Name : name
Property Value : ha-folder-root
Usage of VMware vSphere API
Reference to library
Go to Solution Explorer and select project to VMInfoFace.Interface
Select item References in project
Open context menu over References item and click Add Reference...
Dialog Reference Manager ..
Push button Browse...
Dialog Select the files to reference...
Navigation folder to VMware vSphere API files
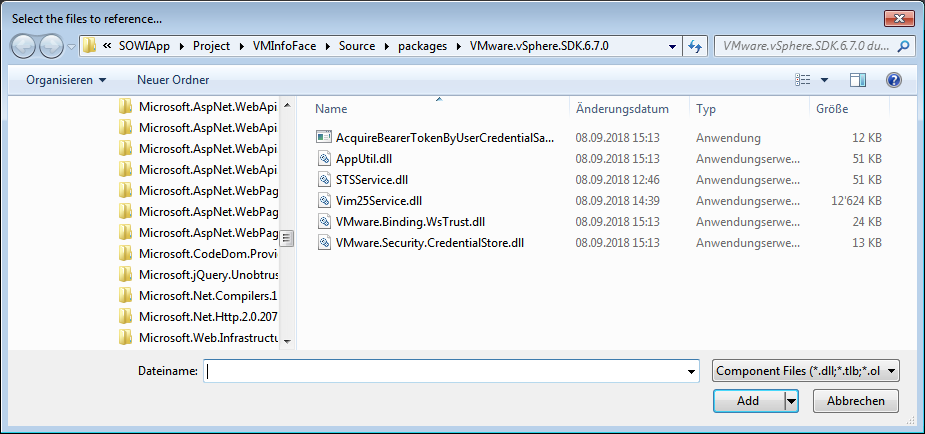
Select to DLL files
Push button Add
Close dialogue Reference Manager .. by button OK
The DLLs AcquireBearerTokenByUserCredentialSample.dll and AppUtil.dll doesn't works as a GAC install because this DLLs has link to Vim25Service.dll and STService.dll (hasn't strong name).